


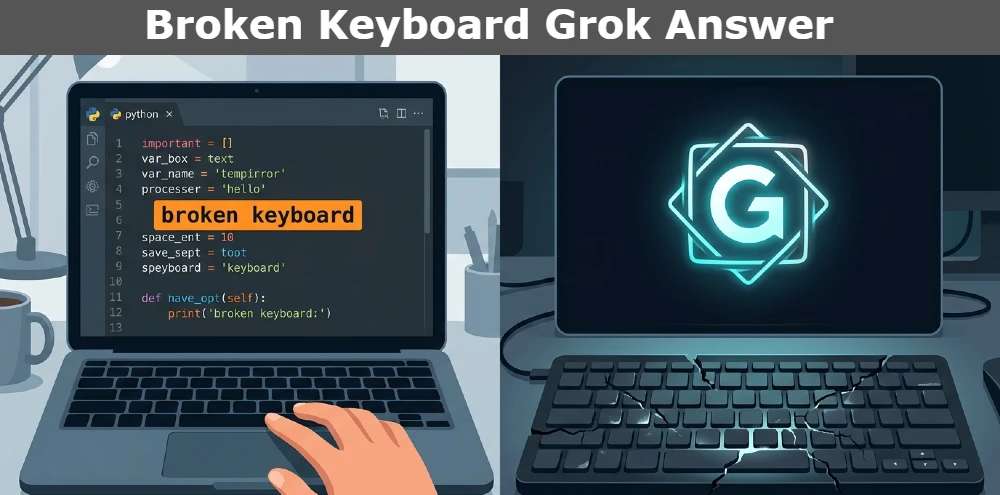
Grok Learning is a Python coding education platform. Grok AI is a chatbot. They share the word “Grok” and nothing else. The broken keyboard problem on each platform is completely unrelated.
Let me explain both quickly so you are sure which one applies to you.
Grok Learning (groklearning.com) is an online coding education platform used by thousands of school and university students across Australia, the UK, and globally. It has structured Python courses with challenges. One of those challenges — typically in Module 4, the strings module — is called “Broken Keyboard.” In that challenge, your job is to write Python code that filters out broken key characters from a typed string. You are writing code to solve a puzzle.
Grok AI (grok.com) is the AI chatbot built by xAI, Elon Musk’s AI company. It has nothing to do with Python courses. Some users experience issues where their keyboard input stops being accepted inside the Grok AI chat interface the text box does not respond when they type, or specific keys misbehave.
Grok 4 free tier voice specifics revealed—details in Grok Voice Mode setup best practices.
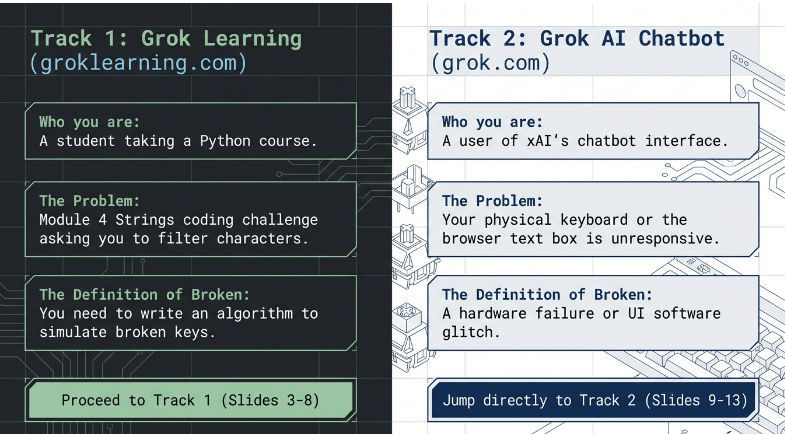
Same word. Completely different problems. Completely different solutions.
If you are still not sure which one you are dealing with: look at the URL in your browser right now. If it says groklearning.com, you are a student doing a Python challenge. If it says grok.com or you are using the Grok app on your phone, you are a Grok AI user.
Now let me help you properly.
GROK LEARNING: THE BROKEN KEYBOARD PYTHON CHALLENGE
What the Broken Keyboard Challenge Actually Asks You to Do
Quick answer: You get two inputs — the text someone typed and a list of broken keys. You remove every character that matches a broken key and print the result. That is the whole problem.
Read this before you look at any code. Seriously. Half the students who get stuck on this challenge are stuck not because they do not know Python — they are stuck because they did not fully understand what the problem is asking.
Here is the problem in plain English.
Imagine someone is typing on a keyboard. But some keys are broken and do not work. Whenever they press a broken key, nothing appears. So if the letter “l” is broken and they try to type “Hello”, what comes out is “Heo” — the two “l” characters just disappear.
Your job is to write a Python program that simulates this.
Your program receives two things:
- Line 1: The text the person tried to type
- Line 2: A string containing all the broken key characters
Your program should print the text with every broken key character removed.
Example:
- Input line 1:
Hello World - Input line 2:
lo - Output:
He Wrd
Every “l” is gone. Every “o” is gone. The space is not in the broken keys so it stays. What remains is “He Wrd.”
Simple concept. Now let me show you why students get confused.
The most common wrong approach is trying to use the .remove() method. If you have tried this, you already know it does not work — .remove() is for lists, not strings. Python strings do not have a .remove() method.
Some students try .replace() in a loop — replacing each broken character with an empty string. This actually works but it is longer than necessary.
Some students try splitting the string with .split() — this breaks immediately when the text contains spaces because splitting by the wrong separator loses your spaces.
The cleanest approach is a simple loop that checks each character individually. Let me show you that now.
The Working Solution for Grok Learning Broken Keyboard — Full Line-by-Line Explanation
Quick answer: Loop through each character in the text. If the character is not in the broken keys string, add it to your result. Print the result. Done.
Here is the working code:
python
text = input()
broken = input()
result = ""
for char in text:
    if char not in broken:
        result += char
print(result)
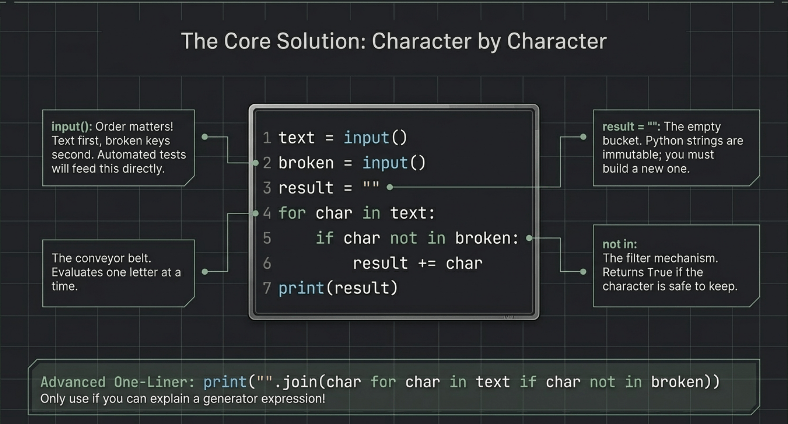
That is the complete solution. Six lines. Let me walk through every single line so you understand exactly what is happening — not just so you can submit it, but so you can use this pattern again in the next challenge.
Line 1: text = input()
This reads the first line of input — the text the person tried to type on their broken keyboard. input() waits for the user to type something and press Enter, then stores whatever they typed as a string in the variable called text.
On Grok Learning, the automated tests will feed this line in automatically. You do not need to type it yourself when testing — the test runner does it for you.
Line 2: broken = input()
This reads the second line of input — the string of broken key characters. So if the broken keys are “a”, “e”, and “o”, this line reads aeo and stores it in the broken variable.
Important: the order of these two lines matters. Text first, broken keys second. Swap them and your code reads the inputs in the wrong order and produces wrong results every time.
Line 3: result = ""
This creates an empty string called result. Think of it as an empty bucket. You are going to look at the text character by character and drop each valid character into this bucket. By the end, the bucket contains your cleaned text.
Why do you need this? Because in Python, you cannot modify a string in place. Strings are what Python calls “immutable” — once created, they cannot be changed. So instead of editing text directly, you build a brand new string called result that contains only the characters you want to keep.
Line 4: for char in text:
This is the loop. In Python, a string is a sequence of characters. You can loop through it the same way you loop through a list. This line says: “go through the string text one character at a time, and for each character, call it char.”
So if text = "Hello", the loop gives you: H, then e, then l, then l, then o — one at a time.
Line 5: if char not in broken:
This is the check. For each character, Python asks: is this character inside the broken string?
The in operator in Python checks for membership. It works on strings, lists, and other sequences. "l" in "helo" returns True because “l” appears in that string. "z" in "helo" returns False because “z” does not appear.
not in is just the opposite — it returns True when the character is NOT in the broken string.
So this line asks: is this character NOT a broken key? If yes, we want to keep it.
Line 6: result += char
If the character passed the check — meaning it is not a broken key — this line adds it to the result string.
result += char is shorthand for result = result + char. Both mean the same thing. You are concatenating (joining) the current result with the new character.
After the loop finishes, result contains your original text with all broken key characters removed.
Line 7: print(result)
Print the finished result. This is your output — the cleaned text that the broken keyboard produced.
Test it yourself before submitting:
Text: Hello World Broken keys: lo
Loop goes through each character:
H— not inlo— add to result:He— not inlo— add to result:Hel— IS inlo— skipl— IS inlo— skipo— IS inlo— skip- (space) — not in
lo— add to result:He W— not inlo— add to result:He Wo— IS inlo— skipr— not inlo— add to result:He Wrl— IS inlo— skipd— not inlo— add to result:He Wrd
Final result: He Wrd
That matches the expected output. The code works.
A Cleaner One-Line Solution Using Python List Comprehension
If you know list comprehension, you can do the same thing in three lines instead of six. Both versions work on Grok Learning.
Once you understand the loop version above, here is a more compact way to write the same logic:
python
text = input()
broken = input()
print("".join(char for char in text if char not in broken))
This does the exact same thing as the six-line version. Let me break down that third line because it looks more complex than it is.
char for char in text if char not in broken — this is a generator expression. It goes through every character in text, and only keeps the ones where char not in broken is true. So it produces a sequence of valid characters.
"".join(...) — this takes that sequence of characters and joins them together into a single string with no separator between them. So individual characters like H, e, W, r, d become HeWrd.
When to use this version: use it if your teacher specifically asks for a Pythonic or concise solution, or if you are comfortable with generator expressions and want cleaner code.
When to use the longer version: use it if you are a beginner, if you need to debug your code, or if you just find it easier to read. Both versions pass the automated tests on Grok Learning. There is no advantage to using the shorter version if you do not fully understand it.
One practical warning: do not use the one-liner in an exam or assignment if you cannot explain what it does. Teachers can tell the difference between a student who understands their solution and one who copied it. The longer version, explained confidently, shows more understanding than the one-liner explained with a shrug.
Why Your Solution Passes Some Tests But Fails Others — The Edge Cases
The most common failure point is when a space character is one of the broken keys, or when the broken keys string is empty. Your code handles these correctly if written as shown above but students often add extra assumptions that break these cases.
You submitted your code. Most tests pass. But one or two fail. This is incredibly frustrating, especially when you manually tested it and it looked right. Here are the exact edge cases that catch students.
Edge case 1: Space is a broken key
Test input:
- Text:
Hello World - Broken keys:
l(that is a space followed by the letter l) - Expected output:
HeoWord
If your code is written correctly using char not in broken, this works automatically. The space character is just another character — ' ' in ' l' returns True, so the space gets removed.
But some students hardcode assumptions like “spaces should always be kept” or add separate conditions to skip checking spaces. That assumption is wrong. The problem does not make exceptions for spaces.
Edge case 2: Broken keys string is empty
Test input:
- Text:
Hello World - Broken keys: “ (empty string)
- Expected output:
Hello World
When broken is an empty string, char not in broken is always True for every character. So every character passes the check and the full text is printed unchanged. Your code handles this correctly without any special condition — as long as you did not add an if broken != "": check that skips the loop.
Edge case 3: All characters are broken
Test input:
- Text:
hello - Broken keys:
helo - Expected output: (empty line)
Every character in hello appears in helo. So result stays as an empty string "" the whole way through. print("") prints a blank line, which is the correct output.
Some students panic when they see their program prints nothing and think something is wrong. It is right. An empty string printed is a blank line.
Edge case 4: Case sensitivity
This one is important.
broken = "H" does NOT remove lowercase h. Python’s in operator is case-sensitive. "h" in "H" returns False because lowercase h and uppercase H are different characters.
If the Grok Learning challenge you are working on specifies that the broken key check is case-insensitive — meaning broken “H” should also remove lowercase “h” — you need to adjust your check:
python
if char.lower() not in broken.lower():This converts both sides to lowercase before comparing. Most versions of the Grok Learning broken keyboard challenge are case-sensitive by default, meaning you do not need this adjustment. But check your challenge description carefully — if it says anything about case, adjust accordingly.
How to test edge cases before submitting:
Run your code four times with these four inputs:
- Normal text with common letters as broken keys
- Text with spaces, broken keys include a space
- Broken keys is an empty string
- Text where every character appears in broken keys
If all four produce the right output, your code is solid. Submit with confidence.
The Broken Keyboard Challenge in Grok Learning Python 2 — How It Differs
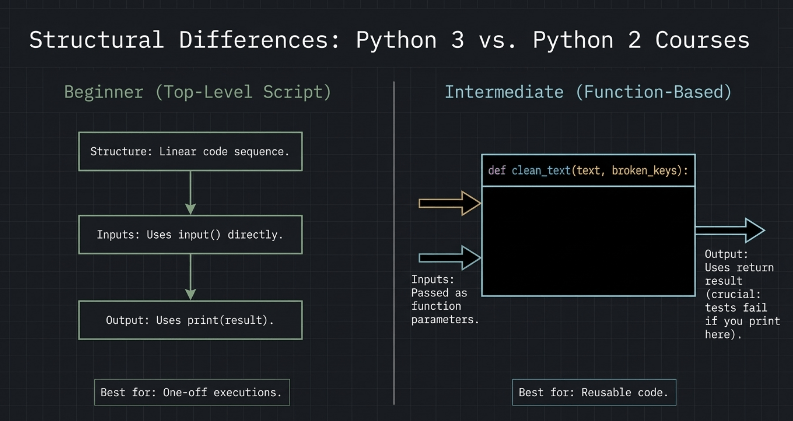
Quick answer: Python 2 on Grok Learning often requires the same logic inside a function, not just as a top-level script. The filtering logic is identical — only the structure changes.
Grok Learning offers both Introduction to Programming (Python) — the beginner course — and Introduction to Programming 2, which builds on it. The broken keyboard challenge appears in both, but the Python 2 version often asks you to write a function.
How to check which course you are on: look at the heading in the Grok Learning interface. It will clearly say which course you are enrolled in.
If you are on the Python 2 version and the challenge asks you to write a function, here is what that looks like:
python
def clean_text(text, broken_keys):
    result = ""
    for char in text:
        if char not in broken_keys:
            result += char
    return result

text = input()
broken = input()
print(clean_text(text, broken))
```

The filtering logic inside the function is identical to the beginner version. The difference is:

- The logic lives inside a `def` block — a named function called `clean_text`
- The function takes two parameters: `text` (what was typed) and `broken_keys` (the broken characters)
- Instead of `print(result)` inside the function, you use `return result` — the function hands the result back to whoever called it
- You then call the function from outside, passing in your inputs, and print the return value

Why does this matter? Because Python 2 starts training you to write reusable code. A function you define once can be called multiple times with different inputs. The top-level script version only works once for one specific input.

If you are on the Python 2 version and you submit the simple top-level version, Grok Learning might still accept it — the automated tests care about output correctness, not code structure. But if the challenge explicitly says "write a function called clean_text", you need the function version.

When in doubt, write the function version. It is always more correct for a Python 2 course context and it demonstrates better understanding.

---

## Why You Should Understand This Before Moving Forward

Quick answer: The broken keyboard challenge uses the exact same pattern as the next five to ten challenges in Module 4. If you copy without understanding, you will hit a wall immediately.

I want to be honest with you about something.

If you just copy the code above and submit it, you will pass this challenge. But Module 4 of Grok Learning does not stop at broken keyboard. Right after this, you will likely see challenges like vowel counter, Caesar cipher, palindrome checker — and possibly character frequency counting.

Every single one of those challenges uses this pattern:
```
for char in string:
    if [some condition about char]:
        do something with char
The broken keyboard challenge is teaching you this pattern. If you skip understanding it now, the next challenge will feel like a wall because you will have no idea where to start.
Take five minutes right now. Read through the solution one more time. Try to explain each line out loud — literally say it out loud. “Line 1 reads the text from input. Line 2 reads the broken keys. Line 3 creates an empty string…”
If you can do that without looking at the explanation, you are ready for every string challenge that follows. If you cannot, re-read the line-by-line section once more.
The Caesar cipher challenge is coming. In that one, you loop through each character and shift it by a number. Same loop structure. Different condition. If you understand for char in text, the Caesar cipher takes ten minutes to solve instead of two hours.
The 10 minutes you spend understanding this now saves you hours on the next three challenges.
SECTION 3 — GROK AI USERS: YOUR KEYBOARD IS NOT WORKING IN THE GROK CHATBOT
Grok AI Keyboard Not Working — Is It Your Hardware or Grok’s Interface?
Quick answer: Open Notepad and try typing. If it works in Notepad but not Grok, the problem is Grok’s interface or your browser. If it does not work anywhere, the problem is your keyboard hardware.
Before you do anything else, run this quick test. Open any basic text editor — Notepad on Windows, TextEdit on Mac, or even just the Google search bar. Type a few words.
Did it work?
If yes: your keyboard hardware is fine. The problem is in your browser or in Grok’s interface specifically. Keep reading this section — the browser fixes below will solve it.
If no: your keyboard has a hardware or driver problem that exists independently of Grok ai. The Grok-specific fixes will not help. Skip to the “physical keyboard is broken” heading below.
There is also a third situation worth checking. Open a different website — not Grok, not Google, just any random site. Try typing in its search bar or any text field.
If typing works everywhere except grok.com, the problem is almost certainly a browser extension conflicting with Grok’s input field, or Grok’s text input losing focus after a page event. Both of these have straightforward fixes.
Understanding the cause first saves you from trying fixes that will never work. A browser cache clear fixes a browser issue. It does absolutely nothing for a physically broken spacebar.
Your Keyboard Stopped Working Inside Grok — Fix It in the Next 3 Minutes
Quick answer: Click the text box, hard refresh the page, or try incognito mode. One of these three fixes resolves the problem for most users within 90 seconds.
Let me give you every fix in order from fastest to most thorough. Start at the top and work your way down until one of them works.
Fix 1 — Click directly inside the text input box
This sounds too simple to matter. It is actually the fix for a surprisingly large number of people.
Grok’s input field loses focus sometimes — especially right after a long response finishes loading. The field is there on screen, it looks active, but technically it is not receiving keyboard input because your browser’s focus has moved elsewhere.
Click directly inside the text box. Not near it — directly inside it. Then try typing.
If this works, great. If the problem keeps happening, you can prevent it by clicking the input box before every message.
Fix 2 — Hard refresh the page
Windows: Ctrl + Shift + R Mac: Cmd + Shift + R
A hard refresh clears the page’s cached state and reloads everything fresh. This fixes Grok keyboard issues caused by session state problems — situations where something in the current page load went wrong and the input stopped responding.
Regular refresh (F5 or Cmd+R) is not always enough because it can load from cache. Hard refresh forces a completely fresh load.
Fix 3 — Try Grok in incognito or private mode
Chrome: Ctrl + Shift + N (Windows) or Cmd + Shift + N (Mac) Firefox: Ctrl + Shift + P Safari: Cmd + Shift + N
Open an incognito window, go to grok.com, try typing.
Incognito mode runs without browser extensions and with a clean session. If typing works in incognito but not in your regular browser, you have a browser extension conflict. The extension is interfering with Grok’s text input handling.
To find which extension is causing it: go back to your regular browser, open the extensions list, disable all of them, refresh Grok, try typing. If it works now, re-enable extensions one at a time, refreshing Grok after each one, until the problem comes back. The last extension you re-enabled is the culprit. Disable or remove it.
Common culprits are grammar checkers (Grammarly is a frequent offender with AI text inputs), ad blockers with aggressive filtering, and privacy extensions that modify how pages interact with form inputs.
Fix 4 — Clear your browser cache
In Chrome: Settings → Privacy and Security → Clear browsing data → check “Cached images and files” and “Cookies and other site data” → Clear data → reopen grok.com.
In Firefox: Settings → Privacy and Security → scroll to Cookies and Site Data → Clear Data.
This is more thorough than a hard refresh. It removes everything Grok’s site has stored in your browser. Sometimes corrupted cache data causes persistent input problems that hard refresh alone cannot fix.
After clearing, log back into Grok — clearing cookies will log you out.
Fix 5 — Check Windows Accessibility Settings
This one catches people who have never touched accessibility settings because some Windows updates enable these features automatically.
Go to: Settings → Accessibility → Keyboard
Check if any of these are turned on:
- Sticky Keys — causes keys to behave as if held down when pressed once
- Filter Keys — ignores brief or repeated keystrokes, making fast typing appear broken
- Toggle Keys — plays sounds when lock keys are pressed but can cause confusion
If any of these are enabled and you did not intentionally turn them on, disable them. Then try Grok again.
On older Windows 10 versions: Control Panel → Ease of Access Center → Make the keyboard easier to use.
Fix 6 — Try a different browser entirely
If you have been using Chrome, try Firefox. If you have been on Firefox, try Edge or Chrome. Download one you do not normally use if needed.
Go to grok.com in the new browser. Try typing.
If it works in a different browser, the problem is specific to your original browser — likely a setting, extension, or corrupted browser profile rather than Grok itself. At this point you can either keep using the alternate browser for Grok or investigate your original browser’s settings more deeply.
Fix 7 — Sign out and sign back in
Sometimes Grok’s authentication session gets into a broken state that causes UI elements including the text input to behave incorrectly.
Click your profile icon, sign out completely, then sign back in. This creates a fresh authenticated session and often resolves persistent interface issues that refreshing alone does not fix.
How to Use Grok AI When Your Physical Keyboard Is Broken
Quick answer: Use Windows voice dictation (Win+H), your phone as input, or the Grok app’s built-in voice mode. You do not need a working keyboard to use Grok.
Your keyboard is physically broken. Some keys do not work, or the whole thing is dead. You still need to use Grok. Here is every practical way to do that.
Option 1 — Windows Voice Dictation (fastest for Windows users)
Press Win + H on your keyboard (or on your on-screen keyboard — explained below).
Windows voice dictation activates immediately. A small microphone panel appears. Speak naturally and Windows converts your speech to text in whatever field is currently active — including Grok’s text input.
This takes about 10 seconds to set up and works immediately with no account or download needed. For most Windows users with a working microphone, this is the fastest solution to a broken keyboard.
To start a new sentence: just speak. Windows adds punctuation automatically in most cases. To send the message in Grok after dictating: click the send button with your mouse.
One limitation: voice dictation handles conversational text well but struggles with technical terms, model names, code snippets, and special characters. For those, use the on-screen keyboard instead.
Option 2 — Mac Dictation
Press Fn twice (on older Macs) or go to System Settings → Keyboard → Dictation → On.
Then press the dictation shortcut (usually Fn Fn) when you want to speak. Mac dictation works very similarly to Windows voice dictation and supports multiple languages.
Option 3 — On-Screen Keyboard
Windows: Press Win + Ctrl + O or go to Settings → Accessibility → Keyboard → On-Screen Keyboard → turn it on.
Mac: System Settings → Accessibility → Keyboard → Accessibility Keyboard → Enable Accessibility Keyboard.
The on-screen keyboard is a full software keyboard you operate with your mouse. Every key is clickable. It is slow compared to typing — but it is reliable, it works in every application including Grok, and it handles special characters and code snippets that voice dictation cannot.
For a short session with a broken keyboard, on-screen keyboard is completely workable. For a long coding or research session, it gets tedious. In that case, consider an external USB keyboard.
Option 4 — Use Grok AI Voice Mode (iPhone)
If you have the Grok app installed on an iPhone, Voice Mode is free. Tap the microphone icon in the app. Speak your question. Grok listens, processes, and responds — all without you typing a single character.
This is honestly the smoothest solution if you have an iPhone. The voice recognition in Grok’s Voice Mode is solid for conversational questions, and you can hold a full back-and-forth conversation without your keyboard.
For Android, Voice Mode requires a paid subscription. On Android without a subscription, use your phone’s built-in voice-to-text in the text input field instead — long press the microphone icon on the Android keyboard.
Option 5 — Use Grok on Your Phone Entirely
If your computer keyboard is completely broken, your phone is a complete replacement for accessing Grok.
Open a browser on your phone, go to grok.com, log in. The mobile web version of Grok works fully. Or download the Grok app from the App Store or Google Play.
Your phone’s touchscreen keyboard handles all input. Not ideal for long sessions — typing a detailed 500-word prompt on a phone keyboard is annoying — but completely functional for quick questions and short interactions.
Option 6 — External USB Keyboard
If you need a long-term solution and your laptop keyboard is physically broken, a USB keyboard is the permanent fix.
Basic USB keyboards cost $10–20. You plug it in and it works immediately on Windows and Mac — no driver installation required, no configuration. It is plug and play.
A Bluetooth keyboard is an alternative if you want wireless, but Bluetooth requires pairing and occasionally drops connection. USB is more reliable for a replacement scenario.
Option 7 — Type on Your Phone, Transfer to Computer
Type your Grok prompt on your phone’s keyboard. Send it to yourself via email, WhatsApp Web, or just copy it to your phone’s clipboard and use a clipboard sync tool. Paste it into Grok on your computer.
This is clunky. It is not elegant. But it works right now, immediately, with zero setup if you are in a situation where you need to use Grok and nothing else is available.
Specific Keys Not Working in Grok — When Only Some Keys Are Broken
Quick answer: If Enter does not send messages, click the send button. If spacebar produces wrong characters, check your keyboard language layout. If a key repeats on its own, check Filter Keys in accessibility settings.
Sometimes the keyboard mostly works but specific keys misbehave in Grok. Here are the most common specific key problems and their fixes.
Enter key not sending your message
In Grok, Enter sends a message and Shift + Enter creates a new line. If your Enter key is physically broken, click the Send button with your mouse — it is the arrow button to the right of the input field.
Alternatively, press Tab to move keyboard focus to the Send button, then press Space to activate it. This lets you send messages without touching the Enter key or the mouse.
Spacebar inserting the wrong character or nothing
This is almost always a keyboard layout mismatch. Your operating system thinks you have a different keyboard layout than you actually have.
Check the language indicator in your taskbar (Windows) or menu bar (Mac). If it shows a language or layout you did not set, switch it back. On Windows, you can accidentally switch layouts with Alt + Shift or Win + Space — these shortcuts cycle through installed keyboard layouts.
Go to language settings and remove any keyboard layouts you did not add intentionally. Keep only the one that matches your physical keyboard.
Backspace not deleting
Select the text you want to delete using Shift + Left Arrow (selects backwards one character at a time) or Shift + Ctrl + Left Arrow (selects backwards one word at a time). Then press Delete instead of Backspace — they do the same thing from opposite directions.
Alternatively: Ctrl + H works as Backspace in some browsers and text fields.
A key keeps repeating automatically (like aaaaaaa)
Two possible causes:
- The physical key is stuck. A piece of debris or liquid is keeping the key pressed. Clean under the key with compressed air. On a laptop, this sometimes requires careful key removal — look up the specific key removal process for your laptop model before attempting.
- Filter Keys is enabled. Filter Keys ignores brief keystrokes but treats a sustained press as repeated input. Go to Settings → Accessibility → Keyboard → Filter Keys and turn it off.
Special characters producing wrong output
Your keyboard layout and your OS layout do not match. For example, your physical keyboard is US layout but your OS is set to UK layout — the @ and " keys swap positions between US and UK, among other differences.
Go to your language settings, check which keyboard layout is active, and match it to your physical keyboard. This immediately fixes all character output mismatches.
Grok AI Mobile Keyboard Problems — When the Touch Keyboard Causes Issues
Quick answer: Tap directly on the input field to bring the keyboard back. Disable autocorrect for technical prompts. Use Grok Voice Mode if the keyboard keeps causing problems.
Mobile Grok keyboard issues are slightly different from desktop issues. Here are the ones that come up most often.
The keyboard disappeared after Grok responded and will not come back
Tap directly on the text input field at the bottom of the screen. Not near it — directly on it. The touch keyboard should reappear.
This happens because when Grok sends a response, the app scrolls down to show it, and focus moves away from the input field. The keyboard correctly hides itself when focus leaves an input. Tapping the input field returns focus and brings the keyboard back.
Autocorrect is changing your technical terms
When you type something like “Ollama” or “grok.com” or a model name, autocorrect confidently changes it to something else. This is genuinely annoying when you are asking Grok technical questions.
For iPhone: tap and hold on an autocorrected word immediately after it changes — a suggestion bubble appears with the original text you typed. Tap your original text to restore it.
For consistent prevention: Settings → General → Keyboard → Auto-Correction → toggle off. Note this disables autocorrect globally, not just in Grok. Many people who use Grok frequently for technical topics find it worth doing.
Alternatively: type technical terms slowly and deliberately, making sure to dismiss autocorrect suggestions as they appear rather than continuing to type and letting autocorrect lock in the change.
Swipe typing producing garbage text
Swipe or glide typing works by predicting words based on the pattern your finger traces. It works well for common words. It completely fails for technical terms, proper nouns, model names, and anything that is not in the swipe keyboard’s dictionary.
For any prompt containing technical content — model names, code terms, URLs, specific names — switch to tap typing. Most keyboards have a button to switch between swipe and tap mode. Or just lift your finger fully between each character to force tap mode.
Third-party keyboard not working in Grok app
The Grok iPhone app supports third-party keyboards — SwiftKey, Gboard, Grammarly keyboard, and others. If your third-party keyboard is causing problems, try switching to the default iOS keyboard: Settings → General → Keyboard → Keyboards → remove the third-party keyboard temporarily → test in Grok.
If the default keyboard works fine, the issue is with the third-party keyboard’s implementation, not Grok. You can either keep using the default keyboard in Grok or contact the third-party keyboard’s support.
Grok app freezes with the keyboard open
If the whole Grok app freezes while you are typing — the keyboard is open but nothing responds — do this:
On iPhone: swipe up from the bottom of the screen slowly to enter the app switcher. Find Grok in the app switcher. Swipe it up and off the top of the screen to close it completely. Do not just press the Home button — that suspends the app, it does not close it. After fully closing, reopen Grok from your home screen.
On Android: tap the square button (recent apps button), find Grok, swipe it away. Reopen.
This resolves 90 percent of Grok app freeze issues. If it happens repeatedly, check for a Grok app update in the App Store or Play Store — freeze bugs are usually fixed in minor updates.
SECTION 4 — ADVANCED HELP FOR BOTH AUDIENCES
When Grok Learning Still Says Wrong After You Used the Correct Solution
Quick answer: Check for extra whitespace in your output, reversed input order, or print instead of return inside a function. These three causes account for almost every “correct code, wrong answer” situation on Grok Learning.
Your code produces the right output when you test it manually. You submit it. Grok Learning says incorrect. This is one of the most frustrating experiences in any online coding course.
Here is every cause and fix.
Cause 1: Extra whitespace or newline in your output
print(result + "\n") adds an extra newline. Grok Learning’s automated tests compare your output exactly — including trailing whitespace. An extra character at the end fails the test even if everything else is right.
Use plain print(result). Nothing extra. Python’s print() already adds one newline at the end automatically, which is the correct behaviour.
Cause 2: You read the inputs in the wrong order
If you wrote broken = input() before text = input(), your code reads the broken keys string first and the text second. For every test case, the inputs come in as text first, broken keys second. Your code gets them swapped and produces completely wrong output.
Read your code carefully and match the input order to the challenge specification. The challenge description always tells you: “the first line contains the text, the second line contains the broken keys” — or similar. Match your input() calls to that order exactly.
Cause 3: Print inside a function instead of return
In function-based challenges, the test runner calls your function and checks what it returns. If you print() inside the function instead of returning, the function returns None and the test sees empty output.
Rule: inside a function, use return result. Outside the function, use print(clean_text(text, broken)).
Cause 4: Reading wrong number of inputs
Some versions of the broken keyboard challenge on Grok Learning have multiple test cases — they give you several pairs of inputs and expect several outputs. If the challenge says “for each test case” or “repeat for multiple inputs,” you need a loop around your input() calls.
A common version looks like this for multiple inputs:
python
n = int(input())
for i in range(n):
    text = input()
    broken = input()
    result = ""
    for char in text:
        if char not in broken:
            result += char
    print(result)
```

If your challenge involves multiple test cases and you wrote code that only handles one pair of inputs, most tests will fail even though your logic is correct.

---

**How to debug using Grok Learning's test feedback:**

When a test fails, Grok Learning shows you the specific input that failed, your actual output, and the expected output. Compare these character by character — literally look at every character. The difference is almost always a single space, a missing newline, or a reversed input order.

If the expected output is `He Wrd` and your output is `He Wrd ` (with a trailing space), you are adding a space somewhere in your loop. Check where.

---

## Can You Use Grok AI to Help Solve Grok Learning Challenges?

Quick answer: Yes, it works. But ask Grok AI to explain the approach first rather than just give you the code — you will actually understand the solution and handle the next challenge yourself.

The irony of this situation is real. You can absolutely use Grok AI (the chatbot at grok.com) to get help with Grok Learning (the coding platform) challenges. I am not going to pretend this is not a thing people do.

But how you use it makes a big difference.

**The wrong way:** paste the challenge into Grok AI, ask "give me the code," copy what it gives you, submit it. You pass this challenge and then completely fail the next one because you learned nothing.

**The right way:** paste the challenge into Grok AI and ask this:

*"I am working on a Python coding challenge. Here is the problem: [paste your challenge description]. Can you explain what concept this challenge is testing and what approach I should take to solve it? Do not give me the code yet — just explain the thinking."*

Grok AI will explain the string iteration concept, the `not in` operator, and the character filtering approach. Then you write the code yourself based on that explanation. When you get stuck on a specific line, you can ask: "I have this specific line: `for char in text:`. Can you explain exactly what this does?"

This approach takes slightly longer than just copying code. It leaves you actually understanding the solution. And it means the next challenge — Caesar cipher, vowel counter, whatever follows — you can approach yourself without needing help.

When is it completely fine to use Grok AI for Grok Learning?

- After you have genuinely tried for 20+ minutes and cannot make progress
- When you have the code but cannot figure out why a specific line does not work
- When you want to understand a better or more Pythonic approach after already solving it yourself
- When you are checking your understanding, not replacing it

The practical reality is that searching "broken keyboard Grok answer" already puts you in the category of students who want help. Using an AI tool that explains the concept clearly is more educational than copying from GitHub and more honest than claiming you did it yourself when you did not.

---

## The Quickest Way to Get Unstuck on Any Grok Learning Challenge Going Forward

Quick answer: Read the problem twice, work an example manually on paper, write pseudocode before writing Python. This three-step approach works for every Grok Learning challenge — not just broken keyboard.

Being stuck on a coding challenge feels like a wall. You stare at the screen. Nothing comes. This is not because you are bad at coding. It is because you jumped to the code before you understood the problem.

Here is the method that works every time.

---

**Step 1: Read the problem description twice and write down the input and output**

After the first read, close your eyes and try to say what the challenge asks in your own words. After the second read, write on paper:

- What is the input? (text string and broken keys string)
- What is the output? (filtered text string)
- What is the rule? (remove characters that appear in broken keys)

If you cannot write these three things after two reads, you need to read the problem once more before writing any code. Coding before you understand the problem produces code that does not solve the problem.

---

**Step 2: Work the example manually on paper**

Take the sample input from the challenge. Trace through what needs to happen to produce the sample output — step by step, without code.

For broken keyboard: text is "Hello World", broken is "lo". Go through each character manually. "H" — not broken, keep. "e" — not broken, keep. "l" — broken, remove. And so on.

By the time you finish tracing the example manually, you have discovered the algorithm. You know you need to check each character one by one. You know you need to check if it is in the broken string. You know you need to collect the surviving characters.

You have now done the hard thinking. Writing the code is just translating that thinking into Python syntax.

---

**Step 3: Write pseudocode first**

Pseudocode is fake code — English that describes the logic without Python syntax. For broken keyboard:
```
read text
read broken keys
create empty result
for each character in text:
    if character is not in broken keys:
        add it to result
print result
Now translate each pseudocode line into Python. You already know what each line needs to do — you just need to look up the syntax if you do not remember it.
This three-step process prevents the blank screen problem. You are never sitting looking at an empty file with no idea where to start. You always have a direction.
Resources inside Grok Learning you might not know about:
After submitting a solution — even a wrong one — look for a “View sample solution” or “See solution” button. Grok Learning provides their official solution for most challenges. Sometimes it is completely different from yours and teaches you a better approach.
Every challenge also has a comments or discussion section. Before spending 45 minutes stuck, check there. Someone has almost certainly posted a question about the exact issue you are facing, and the answer is there.
And one final practical tip: if you have been stuck for more than 30 minutes, take a 10-minute break. Walk away. Get water. Your brain does not stop working on the problem when you step away — it actually keeps processing it in the background. The solution often appears during the break. This is not a motivational saying. It is how working memory and unconscious processing actually function.
Here you can check about free grok video Creation and Free grok alternative.
FAQs
What is the broken keyboard challenge on Grok Learning specifically testing?
It tests string iteration and character membership testing — specifically your ability to loop through a string character by character and use Python’s in operator to check if a character belongs to another string. It is a foundational exercise for all string manipulation challenges that follow.
Does the broken keyboard solution on Grok Learning need to handle uppercase and lowercase differently?
By default, Python’s in operator is case-sensitive, so the solution does not automatically handle case differences. If the challenge specifies case-insensitive matching, add .lower() to both sides of the comparison: if char.lower() not in broken.lower(). Most standard versions of the challenge are case-sensitive.
Can I use str.replace() instead of a loop for the Grok Learning broken keyboard challenge?
Yes, you can loop through each broken character and replace it with an empty string. However, this requires a loop over the broken keys rather than the text, which is slightly less intuitive. The for-loop-over-text approach shown in this article is cleaner and more directly represents the algorithm the challenge is teaching.
Why does Grok Learning say my code is incorrect even when my output looks right?
The most common causes are trailing whitespace in your output, reading inputs in the wrong order, using print inside a function instead of return, or missing handling for multiple test cases. Compare your output to the expected output character by character using Grok Learning’s test feedback.
Does Grok AI (the chatbot) have a feature to help with coding challenges?
Yes. You can paste a coding challenge description into Grok AI and ask for help. For the best learning outcome, ask for an explanation of the approach before asking for the code. Grok AI explains Python concepts clearly and can walk through solutions line by line.
Why does my keyboard work everywhere except Grok’s text input?
The most likely cause is a browser extension conflicting with Grok’s input field — Grammarly and ad blockers are frequent culprits. Test Grok in incognito mode (which disables extensions). If it works in incognito, disable your extensions one by one until you find the conflict.
What is the fastest way to use Grok AI when my keyboard is physically broken?
On Windows, press Win + H to activate voice dictation — speak your prompt and Windows types it into Grok’s input field. On iPhone, use the Grok app’s free Voice Mode. Both solutions work in under 30 seconds with no additional setup.
Why does Grok’s text box sometimes stop responding to my keyboard mid-conversation?
Grok’s input field occasionally loses browser focus after a long response loads or after certain UI interactions. Click directly inside the text box to restore focus. If this happens consistently, try a hard refresh (Ctrl + Shift + R) to start a fresh session.
Is the one-line Python solution using .join() better than the loop version for Grok Learning?
Neither is better in terms of correctness — both pass automated tests. The loop version is better for beginners because it is easier to read, debug, and explain. The one-line version is better if you want to demonstrate comprehension of generator expressions and Pythonic style. Use whichever you fully understand.
After solving broken keyboard on Grok Learning, what challenge should I expect next?
Most Grok Learning Python courses follow broken keyboard with challenges that use the same for char in string pattern: vowel counting, Caesar cipher encoding, palindrome detection, or character frequency counting. Understanding the character iteration pattern from broken keyboard is directly applicable to all of them.
